Unrelated to PeopleSoft, but here is how to run diskpart and reformat a new SSD drive.
When the SSD is recognized in the BIOS, but Windows 7 installation does not detect the drive, follow these steps:
Disconnect any other hard drives or SSDs. Boot the Windows 7 installation disk. Choose repair, then advanced, then command prompt. Type: “diskpart” without quotes and press Enter. You will see a prompt labeled “diskpart”. Type the following commands and press enter after each one.
Diskpart > Select Disk 0 Diskpart > Clean Diskpart > Create Partition Primary Align=1024 Diskpart > Format Quick FS=NTFS Diskpart > List Partition Diskpart > Active Diskpart > Exit
Then reboot the computer to the Windows 7 installation disk.
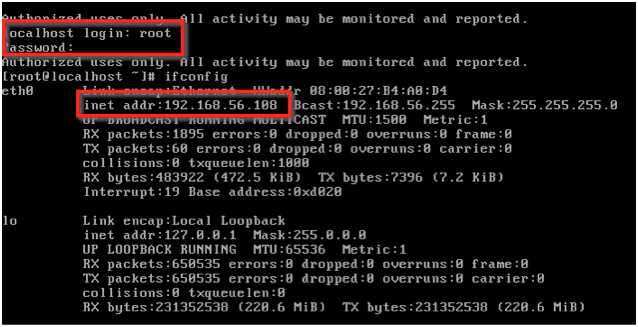
Note: Use the IP address of the PUM. Use ifconfig on the Linux box, to find the IP address. The folder name is tools_client; it has an underscore.
If asked for a userid/password, enter userid of root and the root’s password (Pass#1234 if you used the default recommended in an earlier post).
Go to the Z drive.
Z:
Run the SetupPTClient.bat file.
SetupPTClient.bat
Enter “N” for the deployment for an Update Manager Environment.
Once done, check for errors in the output window.
Fix any issues; review any logs if you have errors.
Sometimes the error is just the need to run vcredist_x64.exe. This file is in the new Tools folder created on the C drive, under setup\psvccrt folder (C:\PT8.57.08_Client_ORA\setup\psvccrt). If running this manually states it is already installed, then the error can be ignored.
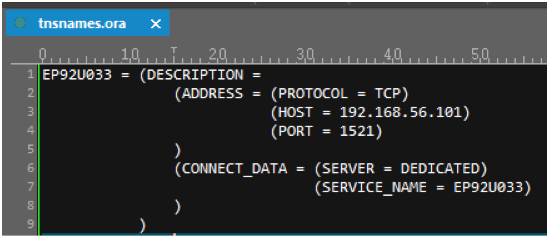
TNSNames
Add/Fix the TNSNames.ora file. This should be in a folder (recently created) called C:\oracle\product\12.1.0\client_1\network\admin\.
You can also get this text from the tnsnames.ora found at \\192.168.56.101\tools_client
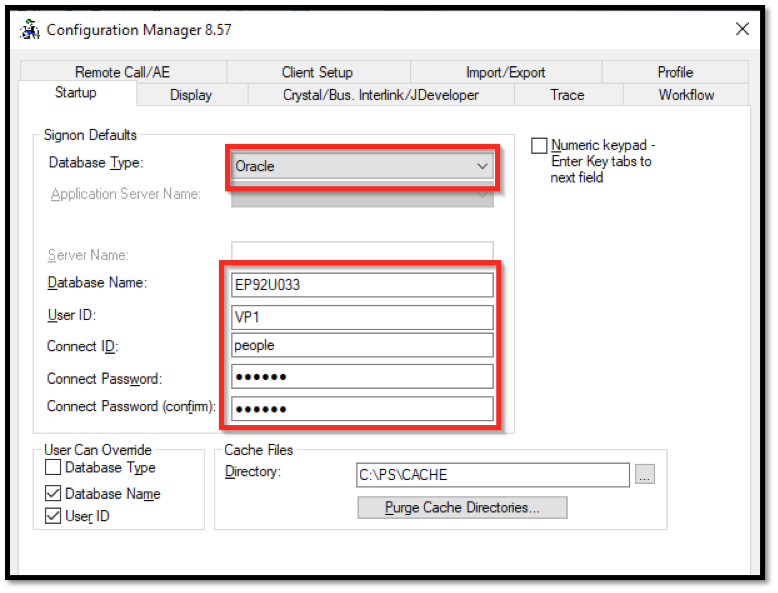
Fix the database type, database name, UserID, and people connect id/password, in Config Manager.
Config manager is found in the Tools folder of the C drive, under C:\PT8.57.08_Client_ORA\bin\winx86\client, called pscfg.exe. (Change the Tools folder for the latest one installed on the C drive.)
If you used the defaults from earlier in this document, the Connect Id and Connect password are both people.
You can optionally do the “Client Setup” and install the workstation, but it is not required.
PeopleSoft Application Designer (PSIDE)
To test App Designer, run PSIDE.exe, found at C:\PT8.57.08_Client_ORA\bin\client\winx86. (Change the root Tools folder for the appropriate Tools that was installed.)
Log in with VP1/VP1 (or PS/PS).
Summary
We installed Application Designer and successfully logged into the environment.
It is time to test if PeopleSoft is accessible via our Browser.
It sometimes takes an extra few minutes for the “web server” to catch up. If this doesn’t work, give it five minutes, then try again.
Go to the WebLogic Web Server: http://192.168.56.101:8000/ Replace the IP address with the one you either setup or were given (by entering the ifconfig command in Linux).
A Welcome to WebLogic page should appear. Click the link on the page, to enter PeopleSoft’s main login page.
If you did a domain name in the setup, you have to use http://fscm9233.com:8000/. You also need to modify the weblogic.xml file (this trick will be added soon).
Test PeopleSoft
Log in with VP1/VP1 (if FSCM). HCM, CS, and ELM uses PS/PS.
We logged into and tested PeopleSoft via the Web Browser. This shows that the web server, application server, and database server are running and installed correctly.
This section starts when the question about the Installation Type appears.
For the PeopleSoft Installation Type: Enter pum (default)
Database Name: Use the default, such as EP92U033 (or FSCM9233 if desired). Be sure to record this name; it will be used when setting up the TNSNames file later.
Port: 1521 (default)
Password Section
Below are sample passwords that should work every time. Since most PUMs are host only, and are based on Demo data, there is little risk in using the same passwords as others.
SYS/SYSTEM: Pass#1234
People Connect id: people (default)
People Connect password: people (no special characters)
SYSADM: SYSADM (use Shift key to do uppercase letters)
VP1 password: VP1 (use shift key to do uppercase letters)
Use PS, if installing HCM, CS, or ELM.
App Server Domain Connection password (no special char) – Pass1234
WebLogic Server Admin password: Pass#1234
PTWEBSERVER password: PTWEBSERVER
PS IB Gateway User: administrator (default)
PS IB Gateway Password: password
Happy with Answers? Enter y
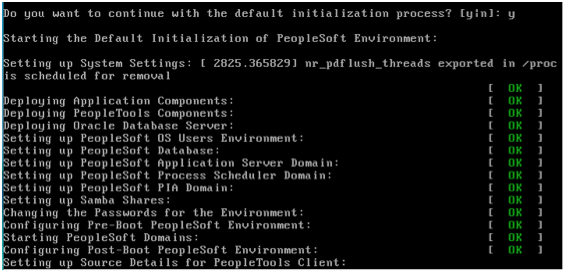
Want to continue default initialization process? Enter y
You should now see the words: Setting up System Settings.
Once the page shows the root login, log in as root. Password is Pass#1234
Note: You do not have to log in, for the web server and app server to run. The prompt for logging in does let you know the system is ready (though sometimes the web and app server need a few extra minutes.)
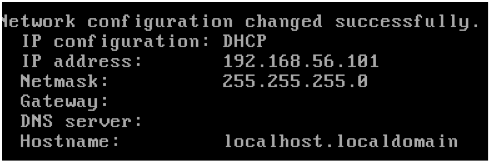
Run ifconfig to get the IP Address. This should be the same IP address we saw in an earlier step.
Summary
We answered several questions that the PUM needs, to set up ports, user ids and passwords. Once the installation was complete, we logged in as root and checked the IP address.
In this step, we will answer the initial questions via the new VirtualBox Image window. We also can pause the setup and reconfigure the memory.
Memory Adjustments
If you have less than 12 Gigs of memory, you should close the Linux Virtual Box window that opened, and send the “Shutdown Signal”. You will do this when the Enter new Root Password prompt appears. Then you can decrease the memory you will need for the new PUM. Then you can restart the Virtual Box Image, and it will continue where it left off. In other words, when the prompt comes up for the new Root Password, send the Shutdown Signal and adjust the memory reserved for the image.
You can send the Shutdown Signal by simply closing the Virtual Image window. Three options will appear; choose “Send Shutdown Signal”.
If you have 12 Gigs or more of RAM/Memory, then proceed to the next section in this post. There is no need to adjust the memory allocated to the new Image.
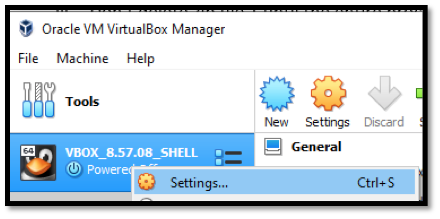
After you have shutdown the Image: In Virtual Box, right-click the new PUM, and select Settings.
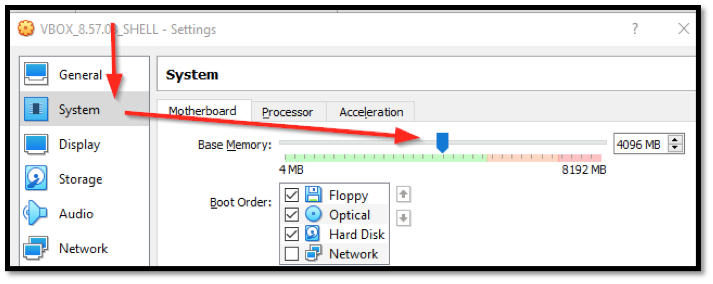
Go to System, and use the slider to decrease the Memory to the Green range. The rule of thumb is only making the Image be 50% of the total installed memory, if memory is an issue.
Click OK to go back to the main page of Virtual Box.
Right-click the PUM image and choose Start, Normal Mode.
First Set of Questions
Note: Make sure all answers are done with the keyboard in “non-Caps” lock. You can double check the caps lock when it asks “enable dynamic”. Keep the machine in “non-Caps” lock, so that your passwords are correct. It is recommended that you use the Shift key to do the uppercase letters, so that you never enter Caps Lock mode.
To help with the install, the below passwords are ones we use, to make life easier. Since the install is mostly likely on a private desktop/laptop, the use of easy passwords should be a small concern. If this image will be accessible via the network, please use complicated passwords.
Enter new root password. Pass#1234
Don’t worry if it complains the password is bad. It will still accept it.
For the question Enable Dynamic, choose y
If you pick “N” to Dynamic, here are defaults you can use:
IP Address: 192.168.0.33
Netmask: 255.255.0.0
Gateway: 192.168.1.1
DNS Server: 8.8.8.8
If asked to manually configure the hostname you can respond with N. If desired, you can enter Hostname: fscm9233.com. But it causes other setup steps needed later.
If you went with the defaults, the default IP will probably be 192.168.56.101, if this is your first PUM install.
A question on whether you are Happy with the answers will appear: answer with y (default)
Answer Y to the Proceed question
The system will now start downloading the DPKs into the VirtualBox Image (Virtual Machine), This could take between 5 minutes to 4 hours, depending on the speed of the desktop/laptop.
Summary
We adjusted the memory if needed, then answered the first slew of questions on the VirtualBox Image.
In this step, we will run the delivered batch job, that gets things rolling.
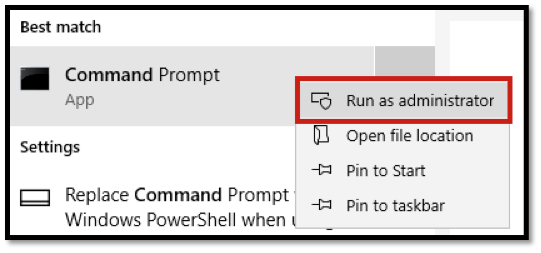
Open Command Prompt with Admin rights
You can search for Command Prompt via Windows Start Menu, then “right click” on the result and pick “Run as administrator”. (When you click Start Menu, you can then type “Comm” and you should see Command Prompt.)
Some instructions say you must be in PowerShell, but it works in the normal Command Prompt; just make sure you run it in Administrator mode. (Being an administrator isn’t enough; you have to search for it, then right click and choose “Run as administrator”.)
Navigate to setup folder.
It should be at C:\FSCM_PUM33\setup. (Replace FSCM_PUM33 with the appropriate folder.)
cd\FSCM_PUM33\setup
Run “psft-dpk-setup.bat” file.
psft-dpk-setup.bat
This unzips files 2 thru 13, starting with 10, 11, 12, 13, then 2, etc. It autodeletes these zip files, after unzipping each one.
Note: Don’t delete zip file 1 until the entire process is finished, and you have successfully logged into PeopleSoft via the web browser.
If something happens and you have to restart over, it is okay that files 2 thru 13 were already unzipped, and then deleted. The psft-dpk-setup.bat has logic to skip the unzipping steps if needed.
When asked: “Import OA into VirtualBox Manager?”, select Y
Select “1” for Host Only.
Virtual Box should automatically open.
If an Error complains about the network, change to Bridge. You can always change to Bridge later, once VirtualBox is fully installed. The Bridge option is useful if another machine on your network will need to access your PUM, when it is running.
Once the VirtualBox Machine is running, you can type Exit, to close the Command Prompt Window.
Summary
We went to the Command Prompt as an Administrator, navigated to the Setup folder for our zip files, ran the batch file psft-dpk-setup, and answered Y and 1 (for the questions on Import and Host Only).
We need to place all of the downloaded files into one directory, then unzip the first file.
Only File 1 needs to be unzipped. The batch file we will be running soon, unzips the rest. These steps are done in File Explorer (Windows Explorer).
Place all PUM zip files in a folder called FSCM_PUM33 (replace FSCM and 32 as needed), on your C drive. Folder name cannot have spaces.
Optional: Make a backup of the 12+ zip files, if you have space on your hard drive. Place on an external hard drive or in a different folder. When future PUMs are released, you won’t have the ability to download this PUM image number again from Oracle. You may also want these 12+ files in case the installation goes wrong, and you want to start over from step 1 (though the PUM install is partially forgiving if you restart in the middle sometimes).
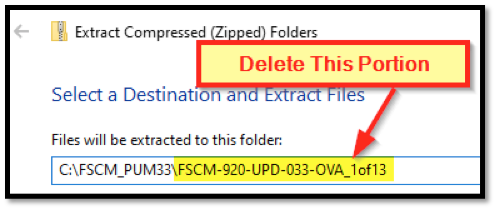
Unzip File 1, but place in same directory as the other Zip Files.
Rewording the above instructions: the contents of this zip file need to be in the same directory as the 12 to 14 zip files (C:\FSCM_PUM33 in our example). There is a setup folder, which should be in the C:\FSCM_PUM33 folder, if the unzipping of file 1 was successful.
Note: When you use the regular unzip program, you have to make sure it isn’t placing the unzipped files in the default sub-directory.
Note: Keep this File 1 as a zipped file with the other Zip files; it will be needed again by the Bootstrap script.
Summary
We placed all the zips files into c:\fscm_pum33\, then unzipped file 1 to extract into the same folder (c:\fscm_pum33). We did not delete zip file 1.
This allows for you to have a full stack of PeopleSoft
software, running on your desktop.
It utilizes a virtual machine, and we’ll be using Virtualbox to do
this. Once installed, your virtual
machine will have a web server, application server, database, and process
scheduler, in addition to the application of your choice (FSCM, HCM,
etc.). You will even have the
option to download the Application Designer tool to your own desktop, with a
connection to the virtual machine’s database. You will be able to access the latest application
enhancements, experience the latest PeopleTools, and even do development, all
on your own desktop or laptop.
The desktop/laptop needs to have “enable hardware
virtualization” turned on, on the BIOS.
Most personal machines have this already on. If the VirtualBox install has an issue, related to this
setting, then you should investigate further in turning this on. (We have not had to turn this on yet,
on any of our machines; it should default to on.)
It is recommended that your desktop/laptop have at least 8 GB of memory, and 125 GB of free disk space on the C drive. It can run with only 4 GB of memory, but you’ll need to pause the VirtualBox part way thru the install, decrease the memory allocated to the VirtualBox image to 2 Gigs, then resume. It is highly recommended that the C drive is a Solid State Drive (SSD); you will be glad you did.
If you already have the zip files, go to the next step/part (link at bottom of this post).
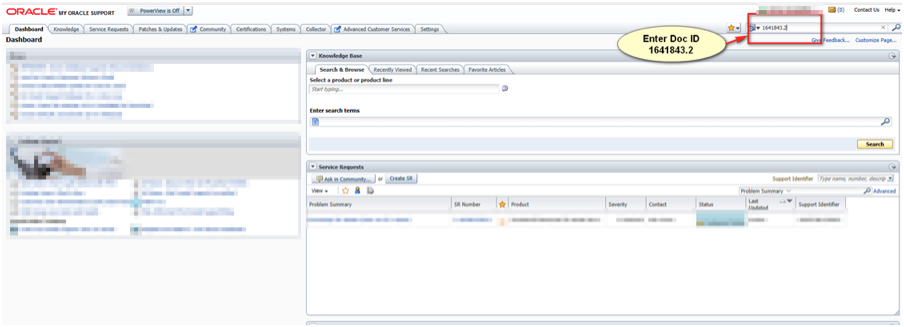
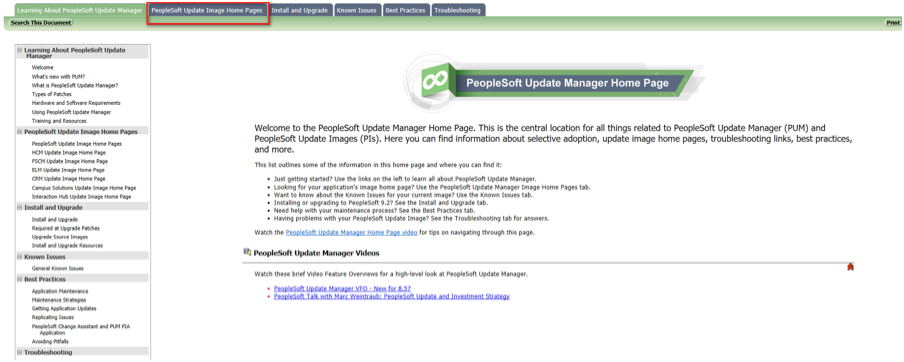
You be redirected to this page – Click on the PeopleSoft Update Image Home Pages tab
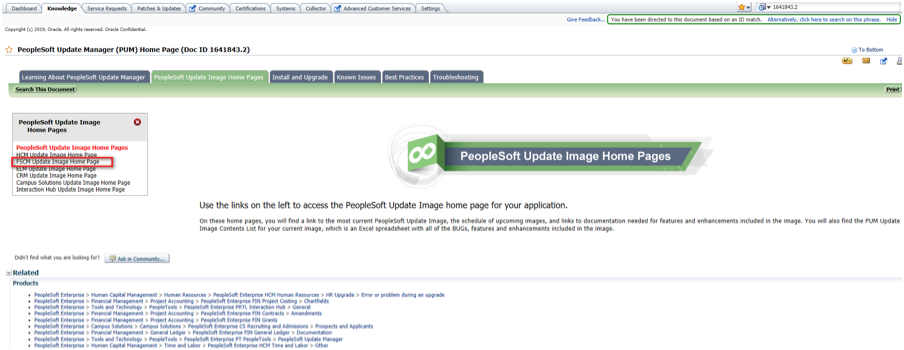
Click the FSCM Update Home Page link (choose which one you need).
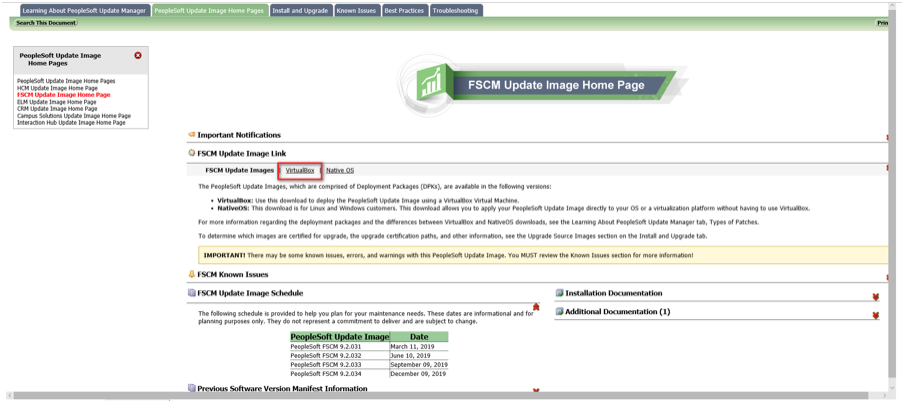
Click the VirtualBox link
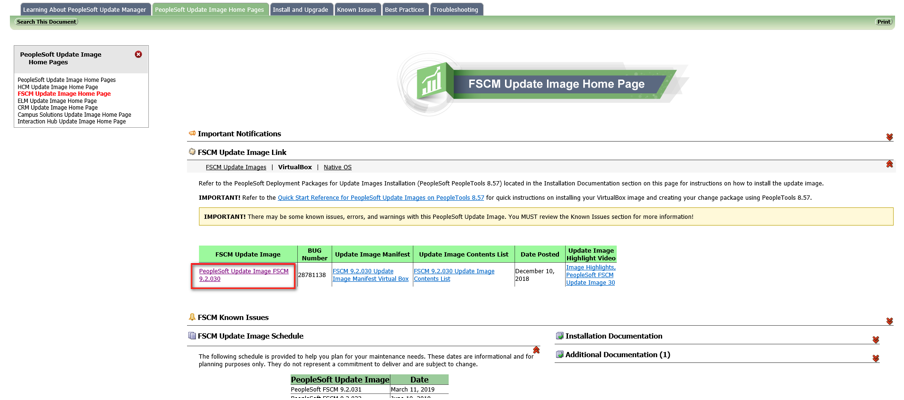
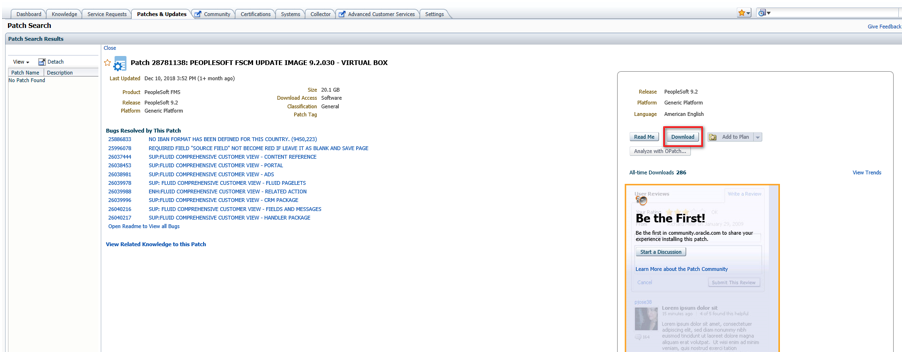
Click the Link for the PUM image
Click the Download button
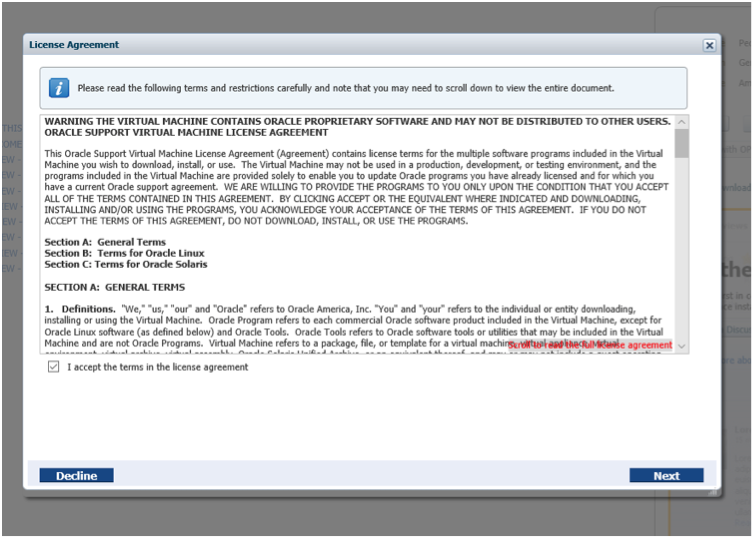
Agree to the terms
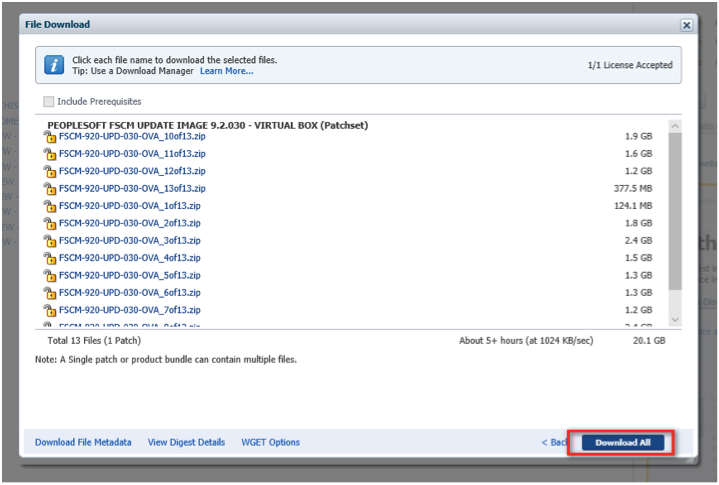
Click Download All.
(You can also click one file at a time. Only four or five can download at a time, unless you tweak the browser to download more in parallel.)
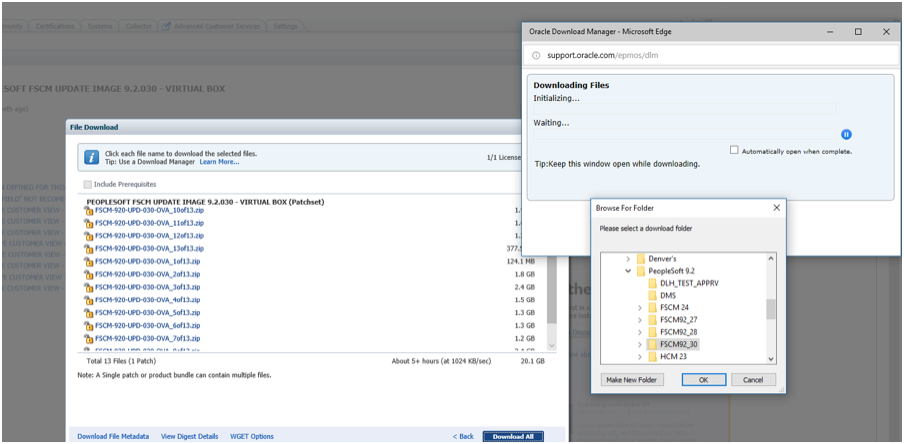
After clicking Download All you will get two pop-ups, one that will track the progress of the download and the other to select a directory for the files. Save the files to a folder that has has a short path and no spaces in the folder name. Example: c:\fscm_pum33.
Note: If you used the Download All, all of the zip files may be in one master zip file. Unzip the master file to the designated folder. You do not have to unzip the 12 to 14 files, but instead, use the instructions in our next post.
Note: This download takes several hours and doesn’t need interaction once it gets started, if you used the Download All option.
Make a backup copy of this folder to a thumb drive or another location on your PC. (When the downloads are done, it is advisable to make a copy of the 12+ zip files, and place them in a secondary folder/location. This can be useful if you have to start the next couple of steps over.)
Note: If you have issues in a later step, it could be that the downloaded zip files are not complete. Sometimes the Download All process zips up partially corrupt zip files. You can always examine each zip file, but don’t worry about unzipping all of the files. In our next step, we will unzip File 1, but the others do not have to be unzipped manually (but examining them may be a good idea). If a zip file is corrupt and/or cannot be opened, just download that file again.
Summary
We downloaded the 12+ files from Oracle for the selected PUM. We should place these files in a folder on the C drive, such as c:\fscm_pum33\.
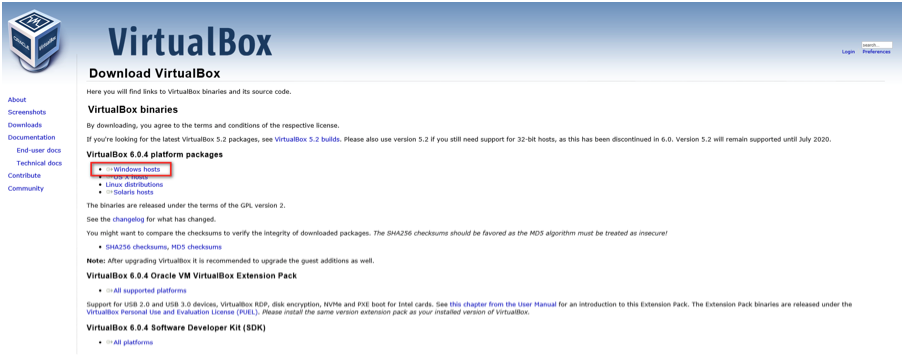
After clicking the ‘Download…’ button select ‘Windows Host’
When prompted to Run or Save, you can do either. If you plan to install on more than one PC, you may wish to Save the download first, then Run to Install.
This is a standard install that will prompt you through without your need to change anything. You may get a popup that asks you to Install the Software. Answer accordingly.