Adding Drilling URLs to PSQuery
Drilling URLs allow you to attach hyperlinks to a field in the PS Query results.
The hyperlink (url) can link to another query, a PeopleSoft page (component) or an external website (as well as a few other types). Drilling URLs lessen the amount of time spent researching and copying/pasting values to find more information. This feature became available with PeopleTools 8.50.
Drilling URLs are built under the Expression tab in the PeopleSoft Query Manager tool.
While creating/editing a query in Query Manager:
- Go to the Expression tab.
- Create a new Expression, and pick the Drilling URL.
- Pick the Drilling URL Type (Query and Component are the most popular).
- The Portal and Node name are optional for most sites.
- Specify the query or component.
- Define the Prompt/Search Key fields. Use the checkbox!
- You can skip the Select Field – Useful if the field/field value pair need to be in the url.
- Click Map Columns to designate which fields in the query will have the hyperlink.
A helpful YouTube video has been built, to walk you through this.
Aggregate Data Into a Single Column
Use LISTAGG as a query expression, to string several rows into a single row, in a single column.
This is a trick for PSQuery, for Oracle Databases only (at this time). We’ll be using the LISTAGG function. Read more about it at
https://www.geeksforgeeks.org/sql-listagg/
In Query Expression, you can add this LISTAGG function.
The below is an example for the Vendor Address phone number table in PeopleSoft FSCM. The intended desire is to display each SETID and VENDOR_ID on its own row, but only once per combination. Then we want a third field to put all phone numbers into a single column. If a vendor has 1 or 20 phone numbers, we just want one row of data, but list all phone numbers in the third field in our results.
Steps to produce this in FSCM
- Create a new Query in Query Manager.
- Insert record VENDOR_ADDR_PHN.
- The Effective Dated logic will be automatically added. This is fine.
- Select the following fields to be displayed: SETID and VENDOR_ID.
- Use the checkboxes on the Query tab.
- Go to the Expressions tab.
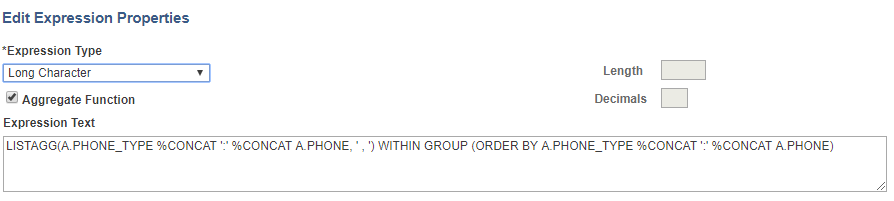
- Create a new Expression that has the following (screenshot found later in this post):
- Expression Type: Long Character
- Aggregate Function: Turn this checkbox on.
- Expression Text: LISTAGG(A.PHONE, ‘ , ‘) WITHIN GROUP (ORDER BY A.PHONE)
- (If you are using this trick with other tables already added, be sure to use the proper alias and field name. Our example assumes the field PHONE is from record alias “A”.)
- Click OK, to save the new expression.
- Choose “Use as Field“, for our new expression.
- This adds our new expression to the Fields tab.
- Modify any heading text on the Fields tab.
- Run to view results.
- You should find that each SETID and VENDOR_ID have their own row, with the third field (Phone) having 1 or more phone numbers, separated by commas.
Bonus
You can also try out this Expression Text. It adds the Phone Type.
LISTAGG(A.PHONE_TYPE %CONCAT ':' %CONCAT A.PHONE, ' , ') WITHIN GROUP (ORDER BY A.PHONE_TYPE %CONCAT ':' %CONCAT A.PHONE)
Results

Finding Number of Days Between Two Dates
In this post, we’ll cover how to find the number of days between two dates, using %DATEDIFF. This can be placed in a Query Expression.
Some users will use expressions that are specific to the database, such as Oracle DB or MS SQL Server DB. Instead, use MetaSQL whenever possible.
To find the difference in days between today and a date, use the following:
%DateDiff(%datein(A.REQ_DT),%CurrentDateIn)
To find the difference between two dates, when you don’t need today, use the following:
%DateDiff(%datein(A.DATE1),%datein(A.DATE2))
You have to use %datein to format the date correctly. PeopleSoft by default turns your date into a string; %datein will turn it back into a date.
Listing of Date Math MetaSQL we find most useful:
- %DateAdd(from_date, nbr_days_to_add) – You can use negative numbers in the second parameter.
- %DateDiff(from_date, to_date)
- %DateTimeDiff(from_datetime, to_datetime) – Gives the difference between two date/times in minutes.
PSQuery Metadata Table Names
Sometimes it is nice to view the metadata of your PSQuery definitions.
List of Tables
You can search the PSRECDEFN table for all records beginning with PSQRY.
SELECT RECNAME, RECDESCR, PARENTRECNAME FROM PSRECDEFN
WHERE RECNAME LIKE 'PSQRY%' AND RECTYPE = 0
The below list is as of 8.54, with a description of each. We’ll then follow up this post with some unique tricks about the meta data tables (coming soon).
Core Query Definition Tables
- PSQRYDEFN-Query Definition
- PSQRYEXPR-Query Expression
- PSQRYBIND-Query Prompt
- PSQRYSELECT-Query Select
- PSQRYRECORD-Query Record
- PSQRYFIELD-Query Field
- PSQRYFIELDDEP-Query Field Dependency
- PSQRYCRITERIA-Query Criteria
Other Tables
- PSQRYFAVORITES-Query Manager Favorites Table
- PSQRYXFORM-Query Transformation
- PSQRYDEL-Query Definition Deletes
- PSQRYLINK-Unknown
- PSQRYPREFS-Unknown
- PSQRYFLAGS-Query Global Flags Table
- PSQRYSTATS-Query RunTime Statistics
- PSQRYEXECLOG-Query RunTime Log
- PSQRYTRANS-Unknown
- PSQRYACCLSTRECS-Query Access Record List
- PSQRYDEFNLANG-Query Definition Alt. Language
- PSQRYBINDLANG-Query Prompt Alternate Lang.
- PSQRYFIELDLANG-Query Field Alternate Language
Prompt For Partial Search – No Percent Sign Needed
Allow user to enter a prompt, without having to add the percent sign. Great for searching for partial values.
Issue
If you use a Like operator in your criteria with prompts, you have to teach the user how to use the percent sign (%) to allow partial searches. Most users learn this while using PeopleSoft pages. But there is a way to allow the user to use a prompt field, without having to add the percent sign, and yet perform a Like operation.
Here is the issue we ran into, followed by the solution. In criteria, if you choose the operator Like, with the left hand side being a field, the right hand side of the operation can only be a constant or prompt. If it allowed an expression, you could sandwich the prompt between two percent signs.
Solution
The work around for Microsoft SQL Server is to make the left hand side be the following expression. (Keep reading for the Oracle solution.) We utilized MS SQL Server’s CHARINDEX function, which is for all purposes is a FIND. The following expression will return which character position the pattern is found in, and will return a zero if the pattern could not be found.
CHARINDEX('a', 'abcdef')To add some more muscle around this, let’s add a prompt for the user to enter a partial string. For our example, we’ll use the Vendor Name field (record PS_VENDOR, field NAME1). Let’s assume this is the first prompt, which would be known as :1 (colon plus the number 1).
CHARINDEX(:1, A.NAME1)
Next, we will add the percent signs.
CHARINDEX('%' + :1 + '%', A.NAME1)Next, we can beef up the example with Upper case functions. That way the user can just enter the string without case concerns.
CHARINDEX(Upper('%' + :1 + '%'), Upper(A.NAME1))Finally, we’ll finish the criteria by selecting the operator “>” (greater than), and the right hand side will be the constant value of zero (0).
Oracle Solution
For Oracle Databases, you can use INSTR. The first two parameters are swapped though. (And yes, I probably should have used %Concat for the + and/or || signs. The function CHARINDEX vs. INSTR already assumes you know which database you are working in, so we might as well hardcode the concatenation symbols too.)
INSTR(Upper(A.NAME1), Upper('%' || :1 || '%'))
Final note
Be sure to let the user know (in the prompt label) that the percent sign should not be used/needed.
Also, there could be performance issues, if there is a lot of data. The database may be unable to use an existing index when using the CHARINDEX or INSTR function.
Left Outer Join Tricks
Left Outer Joins are useful tools! Here are two tricks to get around some issues you may discover.
A left outer join lets two tables be joined in the following manner: All rows from the “left” table are returned, even if a match cannot be found on the “right” table. This differs from normal joins (called an inner join), where a match has to be found for both tables (assuming you did the WHERE criteria correctly).
Practical Example: Left Outer Join
If you had an audit table with the userid in a field such as AUDIT_OPRID, and you wanted the link to the User Profile (PSOPRDEFN) table to get their full name, use a Left Outer Join. Depending on how your site handles User Profiles, you may have decided to delete the User Profile for any users no longer in the system. A Left Outer Join can assist: link the audit table via a left outer join to the PSOPRDEFN table. If a match can be found, you can display the user’s full name (field is OPRDEFNDESC). If a match isn’t found, you still get the audit record’s row, even if the user’s full name isn’t in the query results.
Trick 1: Linking Limitations
Up until version Tools 8.53, you had to outer join a new table based on the last table that was added. In other words, if you had three tables (A, B, and C), and wanted to outer join a new table (D) to the query, it had to be for table C. If you wanted to outer join to table A or B, most people thought you had to rebuild the query (and put them in the right order). There was an issue with this too: what if you wanted to link A to B (via outer join), then A to C (via outer join). The following trick will allow you to Left Outer Join (prior to Tools 8.53), without having to rewrite the query.
If you need to link A to a new table via a left outer join, but there are other tables between A and the next table letter: add table A again (which would be table D in our three table example). Make the link be inner join, and link using the common keys of table A (they are the same table, so they better have commons keys…). Then, add your new table (which would be table E), and select left out join to table D, and finish by selecting the fields to join E to D. This trick is only needed if your Tools enforces that Left Outer Joins must be performed on the last table already in the query.
Trick 2: Linking Assistance Gone Wrong
No matter how you do the Left Outer Join, be aware when PeopleSoft auto populates part of the Criteria for you. For example, several tables automatically apply the EFFDT logic, which is helpful in quickly writing the PS Query. But for a Left Outer Join, this can cause an issue; the EFFDT logic auto added does not follow the Left Outer Join rules, and it in effect makes the new table linked via an Inner Join. If you review the results, you’ll discover that the Left Outer Join table is acting as an Inner Join. An easy fix is to go into the criteria of the EFFDT via the Edit button, and at the bottom of the Edit window, there is a drop down choice to make this criteria be part of the appropriate Left Outer Join.