Start Here: Local Install of a PeopleSoft Image
This series of posts will assist in installing a PeopleSoft Image to your local desktop/laptop.
Everything from downloading the files, installing the full stack image, and configuring a working Application Designer, will be documented. You will in essence have both a working demo of the chosen PeopleSoft application as well as a development environment.
Prerequisites:
- Decent laptop/desktop
- Memory/RAM: It is best to have at least 8 GB of memory. It can work on less than 8 GB, but the image will be slower. 16 GB is optimal. (If you have less than 12 GB of memory, you will need to adjust the memory during the install.)
- Hard Drive: The PeopleSoft Image (PI) will be faster on an SSD Hard Drive. You need about 125 GB of hard drive space free for the largest PIs as of 2019.
- CPU: The more recent CPU chips will make the install and use of the PI better. It will install on a Surface tablet, but will be very slow to install and use.
- Oracle Support ID
- You will need an Oracle Support ID that has PeopleSoft support, in order to download the 12 to 13 zip files.
- Internet Connection
- Does this even have to be mentioned?
- Once you download VirtualBox and the 12 to 13 zip files, you can unplug from the Internet.
8 Easy Steps
Here are 8 easy steps to get PeopleSoft PI installed on your local desktop or laptop.
Disclaimer:
The PeopleSoft image from Oracle has its own use license that should be followed. The terms Oracle, PeopleSoft, and VirtualBox belong to their rightful owners. We make no intentional ownership for any copyrighted, registered, or patented names used on this site or in the posts. Our intention is to further assist Oracle customers to leverage their existing PeopleSoft investment to the fullest extent of the law and physical limits.
Application Data Sets
The following are the prefix names for common Application Data Sets.
- EOCC – Page and Field Configurator
- Allows config changes to pages, such as hiding a page or field, labels, or default values.
- EOPC – Page Composer
- Allows config changes for approval pages.
- EOPM – Security Deployment Tool
- PIVOTGRID – Pivot Grid
- PSPRSM – Content Ref and Homepage Tiles
- PTACM – Automated Configuration Manager
- PTBR – Branding, Macrosets, Themes
- PTPPB – Pagelet Wizard
- PT_SEC – Security (direct movement without using the Security Deployment Tool)
- WC – WorkCenter (PeopleTools portion)
- This is the Tools portion, which is the base of all WorkCenters.
- WORKCENTER – WorkCenter (Enterprise Component portion)
- This is the Enterprise portion, where you can configure the four main areas (My Work, My Links, My Query, and My Reports).
Oracle SQL V$
Here are some popular commands to use in Oracle Database.
If some of these don’t work, it is most likely permission issues.
Session Wait Events
V$SESSIONV$SESSION_WAITV$SESSION_EVENTV$SESS_TIME_MODEL
Long Running Queries
V$SQLV$SESSION_LONGOPS
Session Counters
V$SESSTAT
Training Session on ExcelToCI
Free Webinar to learn PeopleSoft’s ExcelToCI Tool.
This session teaches how to use Excel To CI Templates to do mass uploads into PeopleSoft. During this webinar, we cover how to find the Component Interface (CI), how to modify the CI, and how to use Excel to configure and submit data. Along the way, we also show advanced tricks.
Webinar Notes with Timestamp
- What We Will Cover @ 1:07
- What is Excel To CI @ 2:07
- Where is the Excel To CI Template @ 4:08
- Finding a CI Template in App Designer @ 7:56
- Connect Tab @ 15:14
- Template Tab @ 18:56
- Data Input Tab @ 27:48
- Advanced Trick: Manual Chunking on Data Input Tab @ 31:28
- Advanced Trick: How to Close the Debug Window @ 34:10
- Stage/Submission Tab @ 35:43
- How to Review Rows in Error @ 37:30
- Advanced Trick: Chunking Factor and Error Threshold Example @ 44:58
- Final Points of Webinar @ 50:49
- Advanced Trick: Submit Blanks as Input @ 53:22
Query Stats and Logging
PeopleSoft comes delivered with an option to have Query statistics as well as logging.
Query Statistics
The Query Statistics can be turned on, but only for the entire application. This stores a single row for each Query that is run, with information on how many times it has been run and the average execution time, among many other collected statistics. This information is very useful when preparing for an upgrade; you can determine if a query has been run in the past (starting the day you turn this on).
Steps to turn on Query Statistics:
- Navigate to: PeopleTools, Utilities, Administration, Query Administration.
- Go to the last tab (Settings).
- Turn on Run Query Statistics.
- No Save button. The settings are set automatically.
- Review the PSQRYSTATS table or the first tab (Admin) to see the statistics.

There is no performance degradation we have witnessed, when this it set. It is recommended that this be turned on. The statistics are only collected when this is on, so the sooner you turn it on, the more data you will have in the future, to make better decisions for query cleanups.
Query Logging
In addition to query statistics, you can turn on Query Logging for each query. This will give you information on each query that is executed, including userid, row counts, and timings.
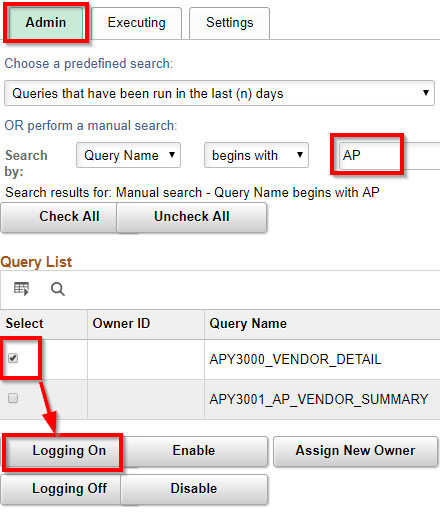
This is on the same navigation/component as the Query Statistics, but on the first tab (Admin). Search for the query you want to add Logging to, then select Logging On.
It is recommended that you search for all queries that begin with your predefined prefix for queries, select all rows, then click Logging On. As new queries are created, the logging for each will be turned off. You may want to come into this page periodically, and turn Logging On for new queries.
Adding Drilling URLs to PSQuery
Drilling URLs allow you to attach hyperlinks to a field in the PS Query results.
The hyperlink (url) can link to another query, a PeopleSoft page (component) or an external website (as well as a few other types). Drilling URLs lessen the amount of time spent researching and copying/pasting values to find more information. This feature became available with PeopleTools 8.50.
Drilling URLs are built under the Expression tab in the PeopleSoft Query Manager tool.
While creating/editing a query in Query Manager:
- Go to the Expression tab.
- Create a new Expression, and pick the Drilling URL.
- Pick the Drilling URL Type (Query and Component are the most popular).
- The Portal and Node name are optional for most sites.
- Specify the query or component.
- Define the Prompt/Search Key fields. Use the checkbox!
- You can skip the Select Field – Useful if the field/field value pair need to be in the url.
- Click Map Columns to designate which fields in the query will have the hyperlink.
A helpful YouTube video has been built, to walk you through this.
Aggregate Data Into a Single Column
Use LISTAGG as a query expression, to string several rows into a single row, in a single column.
This is a trick for PSQuery, for Oracle Databases only (at this time). We’ll be using the LISTAGG function. Read more about it at
https://www.geeksforgeeks.org/sql-listagg/
In Query Expression, you can add this LISTAGG function.
The below is an example for the Vendor Address phone number table in PeopleSoft FSCM. The intended desire is to display each SETID and VENDOR_ID on its own row, but only once per combination. Then we want a third field to put all phone numbers into a single column. If a vendor has 1 or 20 phone numbers, we just want one row of data, but list all phone numbers in the third field in our results.
Steps to produce this in FSCM
- Create a new Query in Query Manager.
- Insert record VENDOR_ADDR_PHN.
- The Effective Dated logic will be automatically added. This is fine.
- Select the following fields to be displayed: SETID and VENDOR_ID.
- Use the checkboxes on the Query tab.
- Go to the Expressions tab.
- Create a new Expression that has the following (screenshot found later in this post):
- Expression Type: Long Character
- Aggregate Function: Turn this checkbox on.
- Expression Text: LISTAGG(A.PHONE, ‘ , ‘) WITHIN GROUP (ORDER BY A.PHONE)
- (If you are using this trick with other tables already added, be sure to use the proper alias and field name. Our example assumes the field PHONE is from record alias “A”.)
- Click OK, to save the new expression.
- Choose “Use as Field“, for our new expression.
- This adds our new expression to the Fields tab.
- Modify any heading text on the Fields tab.
- Run to view results.
- You should find that each SETID and VENDOR_ID have their own row, with the third field (Phone) having 1 or more phone numbers, separated by commas.
Bonus
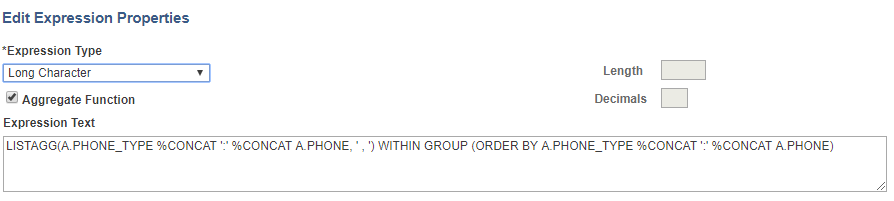
You can also try out this Expression Text. It adds the Phone Type.
LISTAGG(A.PHONE_TYPE %CONCAT ':' %CONCAT A.PHONE, ' , ') WITHIN GROUP (ORDER BY A.PHONE_TYPE %CONCAT ':' %CONCAT A.PHONE)
Results

Finding Number of Days Between Two Dates
In this post, we’ll cover how to find the number of days between two dates, using %DATEDIFF. This can be placed in a Query Expression.
Some users will use expressions that are specific to the database, such as Oracle DB or MS SQL Server DB. Instead, use MetaSQL whenever possible.
To find the difference in days between today and a date, use the following:
%DateDiff(%datein(A.REQ_DT),%CurrentDateIn)
To find the difference between two dates, when you don’t need today, use the following:
%DateDiff(%datein(A.DATE1),%datein(A.DATE2))
You have to use %datein to format the date correctly. PeopleSoft by default turns your date into a string; %datein will turn it back into a date.
Listing of Date Math MetaSQL we find most useful:
- %DateAdd(from_date, nbr_days_to_add) – You can use negative numbers in the second parameter.
- %DateDiff(from_date, to_date)
- %DateTimeDiff(from_datetime, to_datetime) – Gives the difference between two date/times in minutes.
Email Distributions Using nVision Scopes
Instructions on how to setup dynamic email distributions using nVision Scopes.
(Instructions found via link at bottom.)
Overview
nVision Scopes are useful for running a single nVision Report Request to several individual nVision Excel files (instances). These instances can each represent a department, for example. It’s like have an income statement for the entire company, but with an extra “where” clause per department, for each file/instance.
These instances can be output to the Web (Report Manager), File (file server) or to email.
With very little setup, you can easily choose a single email address for “all” instances for a given Report Request to send to. But with additional setup, you can have each “instance” go to its own “set of email addresses”. There are two levels of complexity for this. You can have each “department instance” to have a single email address, or you can have a tree where different levels of the tree can contain email addresses.
In this document, we will show you how you can obtain this widest level of configuration, using a tree. This will allow both multiple levels of emails in the tree, as well as having two or more people on the email distribution. We also allow email setup to be by User Profile name, Security Role, or the actual email address (useful for external emails.)
This document will show you how to set this up in your PeopleSoft environment. There are only two “custom” objects that are created; two views that will be new to your system. The remaining steps can all be done from the online PIA pages (configuration).
We will be using Tree Manager to take full advantage of nVision Scopes and Email Distributions. (This set up also allows emails to be set at a higher Tree Node level.) This solution also allows you to use a Deptid Range when setting up the Leafs on your Tree.
Enjoy.

Find Records To Place Into App Designer For a Field Size Change
When you change a field’s size (delivered or custom), you can use the following script to ensure you have all the necessary tables, views, and temporary tables in your project.
A quick trick too: You can mark the records objects as “Do Not Upgrade” in the App Designer project. This allows the “Project” to have a reference for the tables, views, and temporary tables for a quick “Build Project” actions, but doesn’t actually migrate the record definitions. You only need to migrate the Field with the “Upgrade Flag” on, then Build the Project on the target (Alter Tables and Create Views).
Just change the Fieldname in the following SQL.
select DISTINCT R.RECNAME
, case R.RECTYPE when 0 then 'Record' when 1 then 'View' else 'Temp Table' end "RecType Descr"
from PSRECDEFN R, PSRECFIELDALL F
where R.RECNAME = F.RECNAME
AND R.RECTYPE in (0,1,7) --0 is Record, 1 is View, 7 Temp Tables
AND F.FIELDNAME IN ('ITEM_FIELD_C30_A')
ORDER BY 1;
Once you have an App Designer Project in place, you can run the following SQL to find which record definitions are missing from your project.
Change the Fieldname and Project name:
select DISTINCT R.RECNAME
, case R.RECTYPE when 0 then 'Record' when 1 then 'View' else 'Temp Table' end "RecType Descr"
from PSRECDEFN R, PSRECFIELDALL F
where R.RECNAME = F.RECNAME
AND R.RECTYPE in (0,1,7) --0 is Record, 1 is View, 7 Temp Tables
AND F.FIELDNAME IN ('ITEM_FIELD_C30_A')
and NOT exists (select 'x' from PSPROJECTITEM P
     WHERE P.OBJECTTYPE = 0 AND P.OBJECTID1 = 1
     AND P.OBJECTVALUE1 = R.RECNAME
     AND P.PROJECTNAME LIKE '%1047_EXTEND%')
ORDER BY 1;