Part 3 – Unzip PUM File 1
We need to place all of the downloaded files into one directory, then unzip the first file.
Only File 1 needs to be unzipped. The batch file we will be running soon, unzips the rest. These steps are done in File Explorer (Windows Explorer).
Place all PUM zip files in a folder called FSCM_PUM33 (replace FSCM and 32 as needed), on your C drive. Folder name cannot have spaces.
Optional: Make a backup of the 12+ zip files, if you have space on your hard drive. Place on an external hard drive or in a different folder. When future PUMs are released, you won’t have the ability to download this PUM image number again from Oracle. You may also want these 12+ files in case the installation goes wrong, and you want to start over from step 1 (though the PUM install is partially forgiving if you restart in the middle sometimes).
Unzip File 1, but place in same directory as the other Zip Files.
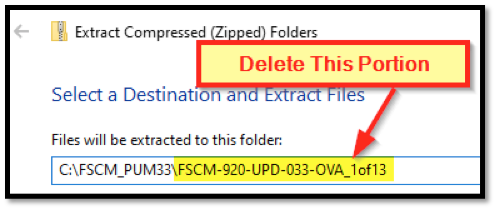
Rewording the above instructions: the contents of this zip file need to be in the same directory as the 12 to 14 zip files (C:\FSCM_PUM33 in our example). There is a setup folder, which should be in the C:\FSCM_PUM33 folder, if the unzipping of file 1 was successful.
Note: When you use the regular unzip program, you have to make sure it isn’t placing the unzipped files in the default sub-directory.
Note: Keep this File 1 as a zipped file with the other Zip files; it will be needed again by the Bootstrap script.
Summary
We placed all the zips files into c:\fscm_pum33\, then unzipped file 1 to extract into the same folder (c:\fscm_pum33). We did not delete zip file 1.